
You don’t need a renovation or a big budget to fix a cluttered bathroom — just a few clever projects and things you may already own. The best DIY organization makes a real difference for a few dollars and an afternoon, turning junk-drawer chaos into a tidy, functional space.
These 18 DIY bathroom organization ideas lean on repurposing, no-drill hacks, and simple builds anyone can manage. Pick the projects that suit your space and your tools, and watch a small effort pay off every single morning.
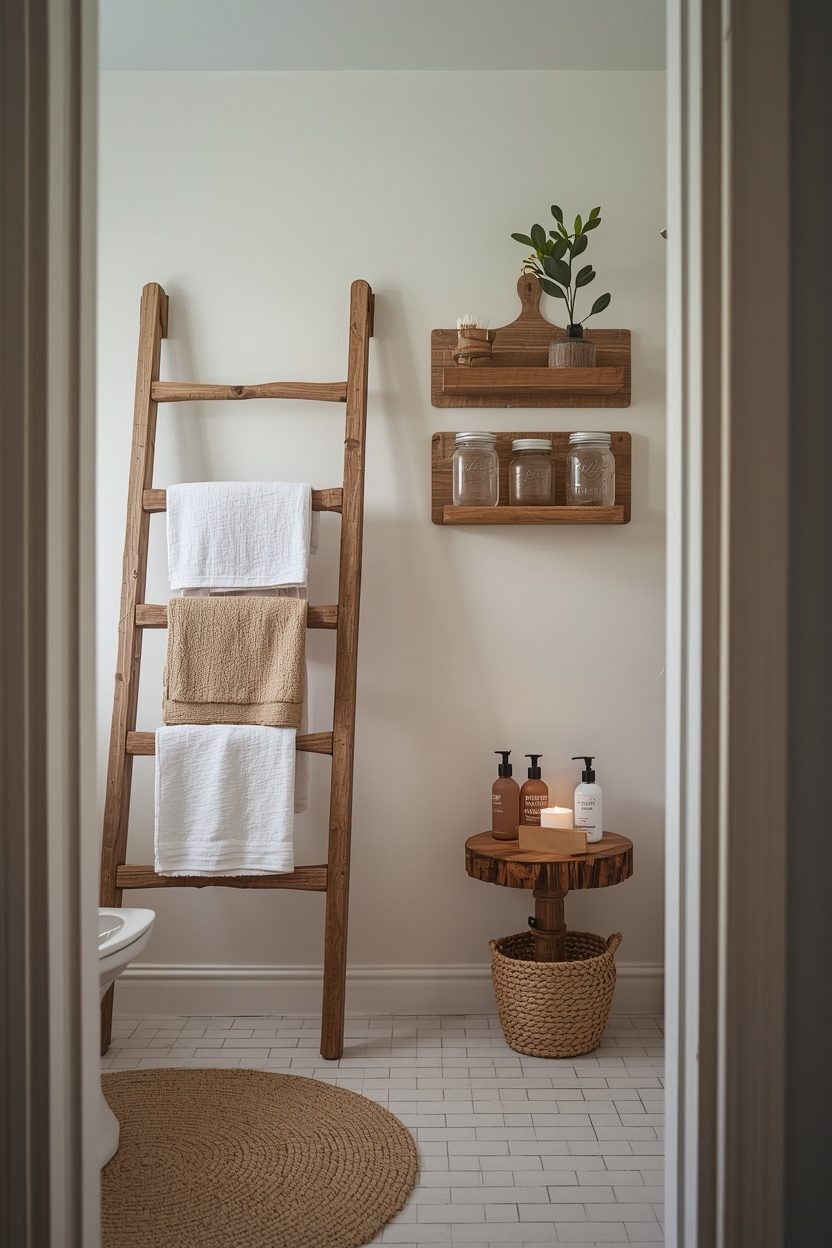
1. Mount Mason Jars on a Board
A few mason jars clamped to a mounted board make a charming, useful wall organizer for brushes, cotton balls, and swabs. It clears the counter and adds rustic character for the cost of a board and some clamps.
Stain or paint the board to match your bathroom, and space the jars so each holds one category. It’s a beginner-friendly project that delivers a surprising amount of tidy storage on one small strip of wall.

2. Repurpose a Wooden Ladder as a Towel Rack
An old wooden ladder leaned against the wall becomes an instant towel rack with rustic charm. Each rung holds a towel, and the whole thing took nothing more than a sand and a coat of sealer.
Anchor it to the wall so it can’t slip, and it doubles as a spot to drape a robe or hang a plant. A thrifted or salvaged ladder is the kind of cheap repurpose that looks far more expensive than it was.

3. Add a Tension Rod Under the Sink
A simple tension rod mounted inside the under-sink cabinet hangs spray bottles by their trigger handles, freeing the floor of the cabinet for bins and baskets below.
It costs a few dollars, installs in seconds with no tools, and instantly doubles your usable under-sink space. It’s one of the smartest no-drill hacks for the most chaotic cabinet in the house.

4. Build Floating Shelves From Reclaimed Wood
Floating shelves from a reclaimed board and hidden brackets are a weekend project that adds character and storage at once. The weathered grain brings warmth that a store shelf can’t match.
Sand, seal against moisture, and mount into studs for strength. A pair of reclaimed shelves above the toilet or beside the vanity is a satisfying build that looks custom for the cost of one board.

5. Use a Magnetic Strip for Metal Tools
The little metal tools — tweezers, clippers, bobby pins — are always lost. A slim magnetic strip mounted inside a cabinet door or on the wall holds them all in plain sight, never to vanish into a drawer again.
A kitchen knife magnet or a strip of adhesive magnets does the job. It’s a tiny project that solves the most annoying small-item clutter in the bathroom.

6. Repurpose a Spice Rack for Products
A wall-mounted spice rack is the perfect size for small bathroom bottles — nail polish, serums, samples, essential oils. Repurposing one gives these tiny items a tidy home and keeps them off the counter.
Thrift stores are full of cheap wooden spice racks. A quick paint or stain matches it to your bathroom, and suddenly the smallest, most scattered products have a dedicated shelf.

7. Turn Crates or Baskets Into Shelving
Wooden crates mounted on the wall become rustic cubby shelving for towels, baskets, and supplies. Stack and fix two or three for a storage unit that costs a fraction of a bought one.
Sand and seal them for the bathroom, and arrange them in a staggered pattern for visual interest. Crates bring warm wood texture and real storage in a project that needs only a drill and a few screws.

8. Make a Hair-Tool Holder From Pipe
Hot tools are awkward to store, but a metal cup or a length of wide pipe mounted inside the cabinet door holds a hairdryer or straighteners upright with the cords tucked away.
It keeps hot tools off the counter and cools them safely out of sight. A few PVC or metal cups screwed to the door turn the wasted inside-door space into a dedicated hair-tool station.

9. Stick On No-Drill Hooks and Baskets
Renters and the drill-averse have a whole toolkit in adhesive hooks and stick-on baskets. They hold towels, robes, and products on tile or painted walls with no holes, and the good ones peel off clean.
Press them onto a clean, dry surface and let them cure before loading. It’s the easiest way to add hooks and small shelves exactly where you need them without a single tool.

10. Cut Custom Drawer Dividers
Store-bought dividers rarely fit a drawer exactly. Cutting your own from thin plywood, balsa, or even sturdy cardboard means every inch is used and each item gets a snug, custom slot.
Measure the drawer, cut strips to fit, and slot them in a grid. It’s a satisfying, near-free project that turns the most chaotic drawer into the most organized one in the bathroom.

11. Repurpose a Tiered Fruit Basket
A hanging tiered fruit basket isn’t just for the kitchen. Hung in a bathroom corner or from the ceiling, its tiers hold rolled towels, products, or bath toys, using vertical air space nothing else reaches.
It’s a clever repurpose that adds storage without touching the counter or walls much. A brass or wire basket also looks intentional rather than improvised once it’s styled with towels and a plant.

12. Stand Brushes in a Jar on a Tray
The simplest DIY of all: stand brushes upright in a pretty jar, fill the base with decorative beads or coffee beans to hold them in place, and set it on a tray with your other daily items.
It keeps brushes visible, upright, and within reach instead of rolling around a drawer. Grouped on a tray, a few jars and dishes turn loose daily items into a tidy, styled counter vignette.

13. Hang a Shoe Organizer for Products
A clear-pocket over-the-door shoe organizer is a cult organization hack for a reason. Hung on the bathroom door, its pockets hold bottles, tools, and supplies, turning the back of the door into a wall of storage.
The clear pockets let you see everything at a glance. It’s cheap, needs no installation, and instantly adds storage for the overflow that has nowhere else to go in a small bathroom.

14. Wrap Plain Bins in Rope or Fabric
Cheap plastic bins do the organizing, but they look the part once you dress them up. Wrapping a plain bin in jute rope or covering it in linen turns dollar-store storage into something that looks custom on an open shelf.
A glue gun and a length of rope is all it takes. It’s the trick that lets you organize on a budget without the open shelves looking like a supply closet.

15. Combine Stick-On LED Light With Storage
A stick-on, battery or USB LED strip inside a dark cabinet or under a shelf does double duty: it lights the contents so you can find things, and it adds a warm glow that makes the storage look considered.
Peel-and-stick warm LED strips need no wiring and cost very little. Adding light to a dim cabinet is a tiny project that makes an organized space both more usable and prettier at night.

16. Repurpose a Wine Rack for Rolled Towels
A wine rack’s bottle slots are exactly the right size for rolled hand towels. Repurposing one — wall-mounted or freestanding — gives towels a tidy, spa-like home and turns a thrift find into bathroom storage.
Roll the towels tightly and slot them in like bottles. It’s a clever repurpose that looks deliberately styled, especially in a wood or metal rack that suits the bathroom.

17. Build a Simple Pegboard Wall
A pegboard wall is endlessly flexible storage. Painted to match the bathroom and fitted with hooks, small shelves, and baskets, it holds tools, products, and towels in a layout you can rearrange anytime.
Frame it for a finished look and paint it a soft colour so it reads as decor. It’s the ultimate adaptable DIY — add or move pegs as your needs change without a single new hole in the wall.

18. Make a Turntable From a Cheap Tray
A lazy Susan transforms a deep cabinet, and you can make one cheaply by fixing a small turntable bearing under a wooden tray or plate. Spin it to bring back-row bottles to the front instead of digging.
Pre-made turntable bearings cost very little and screw straight on. This tiny build solves the classic problem of products lost and expiring in the dark back corners of a cabinet.

Where I’d Start if I Only Did Three Things
If I were tackling a cluttered bathroom with DIY, I’d start with the under-sink cabinet — a tension rod for spray bottles and a couple of wrapped bins instantly tame the worst chaos for a few dollars. Next, I’d add vertical storage with reclaimed-wood floating shelves or a repurposed crate, getting overflow off the counter. Third, I’d corral the small stuff with custom-cut dividers and a jar-on-a-tray for brushes. The messy cabinet, a wall of shelves, and contained small items — that order makes the biggest visible difference fastest.
FAQ
What’s the cheapest DIY bathroom organization project?
A tension rod under the sink and a stand-up jar for brushes cost almost nothing and solve two of the most common clutter problems. Repurposing things you already own — a wine rack, a spice rack, a tray — costs nothing at all. The best DIY organization often uses items you have rather than anything you buy.
I can’t drill into the walls — which projects still work?
Plenty. Adhesive hooks and stick-on baskets, an over-the-door shoe organizer, a tension rod under the sink, a leaned ladder, a freestanding crate or rolling cart, and jars and trays on existing surfaces all add storage with zero holes. Renters can get a fully organized bathroom without touching the walls.
How do I make cheap DIY storage look good, not junky?
Unify it. Paint or stain wood projects in one tone, wrap plastic bins in rope or linen, decant into matching jars, and keep a consistent palette of wood, white, and natural fibre. The organizing can be thrifted and homemade; pulling it together with one colour story is what makes it look styled rather than scrappy.
Which DIY project makes the biggest difference for the least effort?
The tension rod under the sink — it takes seconds, costs a few dollars, needs no tools, and instantly doubles the usable space in the most chaotic cabinet in the bathroom. For visible impact, a stand-up jar for brushes and a tray to corral the counter run a close second.
Conclusion
DIY bathroom organization proves that a tidy, functional space doesn’t require money or a renovation — just a few clever projects and a willingness to repurpose what you have. A tension rod, some reclaimed shelves, custom dividers, and a handful of thrifted finds make a genuine difference for an afternoon’s work. Start with the messiest cabinet, build storage upward, and watch small effort pay off every morning.
Leave a Reply